Oracle Advance Pricing – Cascading Discounts

Cascading discount is used when the discount need to be applied on subtotal. As a standard functionality of Oracle pricing the discount is always applied on the Total of the price. The interesting cases of cascade discount is always seen in the promotion display where it is written as 50+20%(not 70%) discount. This means the price will be first discounted to 50% and then the 20% off will be given on the remaining 50%. Example of this could be

Shirt Price is 100 USD

70% off means shirt price will be 30 USD

50+20% off means (100-50)-(50x.20)=40 USD

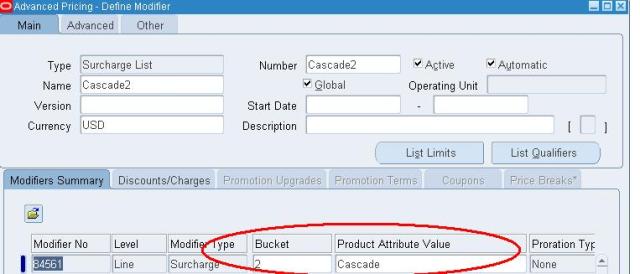
When setting up a modifier, you can assign a modifier line to a particular bucket, such as Bucket 1, 2, or 3, to define cascading price adjustments. This setup controls how discounts and other benefits are calculated. This will help to apply discount on the sub total

QP: Allow Buckets for Manual Modifiers

This profile option enables you to define buckets for manual line or group of line level modifiers Values

• Yes: Enables you to define buckets for manual line or group of line level modifiers.

• No: You cannot define buckets for manual line or group of line level modifiers.

If the profile value is changed from Yes to No and there are manual modifiers defined with buckets, the manual modifiers defined with buckets need to be end-dated or deactivated. The pricing engine will return the manual bucketed adjustment even if the profile is set to No.

Null Bucket

Modifiers that are assigned to a Null bucket are applied last and always adjust from the list price.

Example Scenario: Define One Discount of 10% in Bucket1

Define Second Discount with 10% Surcharge in Bucket2

Define third Discount with Lump sum 10 in Bucket3

Item Price is 100 USD

System should work as follows

After first discount : Value will 90

After second: 90+9=99

After third: 99-10=89

Setups

Create the modifier with Buckets

Created another Bucket

Similarly 3rd Bucket can also be created for Lumpsum discount

Once this is created then enter the sales order and validate the price.

This functionality is used very widely in the retail industries and add value to advance pricing features.

Posted in Oracle Application, Oracle Pricing | Tagged , , , , , , , , | Leave a comment

Sourcing against the Contract PO in Oracle Procurement

Sourcing is the key feature of Oracle procurement which provides the flexibility to organization for automating the buying process so that buyers could put efforts towards more value added activities. Most of the organization does regular business with standard suppliers for the regular use items. They don’t do the complete process of quotation and analysis for every frequent purchase they do. Few of the examples are

  1. Buying phones  
  2. Buying stationery
  3. Buying printers
  4. Buying laptops

For most the above purchases, organization does not expect to go through the complete procurement process. As the negotiation is done so they prefer to do a contract with the supplier with the negotiated prices. These prices will be available on their iprocurement catalogue. Once the item is selected by requester and approved by his supervisor will make sure an automatic PO is created and emailed to supplier. To achieve this process we do need to setup ‘Sourcing against the contract PO for catalogue item’. In this post I will discuss how to set this feature in oracle.

 Oracle iprocurement provides the feature to associate the contract PO against the requisition line which is created in iprocurement. This allows the automatic creation of PO and it uses PO create document workflow. Following steps need to be followed to achieve this functionality

  1. Create a contract PO for the supplier and site in core purchasing
  2. Bulk load the catalogue items and specify the contract PO number in the file. The template for the same could be taken from the econtent Manager responsibility
  3. Once items are bulk loaded then validate the item and confirm the contract number does appear for each item.
  4. Now create the requisition for this item and approve the same
  5. Automatically standard PO will be created and

This automation is achedFollowing workflow attributes plays the key role for this execution from Create PO document workflow. This workflow is assigned in the requisition document type.

1 Is Automatic Creation Allowed?  Yes

2 Should Contract be used to autocreate Doc? Yes

3 Is Contract Required on Requisition Line? Yes

This automation is achieved by the workflow named as Create PO Document. This workflow is assigned in the document type screen for requisition. Following attributes plays the key role for this execution from Create PO document workflow.

1. Is Automatic Creation Allowed?  Yes

2. Should Contract be used to autocreate Doc? Yes

3. Is Contract Required on Requisition Line? Yes

As the creation processes is setup as deferred in Main Requisition approval workflow so after the requisition is sent for approval workflow Background process need to be run for item type as ‘Requisition’. Once that is completed the standardPOwill get automatically created.

Oracle Procurement also provides options of auto Sourcing with ASL and Sourcing rule. I would try to bring some of those topics also for our discussion later

Posted in Oracle Procurement | Tagged , , , , , | 1 Comment

Oracle Advance Pricing: Multi Dimensional Pricing

Multi Dimensional pricing is very interesting feature of Oracle pricing. With the help of this feature, pricing of any product could be decided on the basis of two or more variables. E.g If width between 2-4 and thickness between 1-3 then multiple the price by 0.3. I will try to explain this feature with the help of below mentioned Example scenario so that we could understand the necessary setup required.

Example Scenario: Customer is in the business of second hand Photocopier selling. They wanted to price the photocopier on the basis of Age of Photocopier and model type. Which means 4 year old photocopier with standard feature should have different price then 4 year old photocopier with advanced features

Following Steps are required to make this work.

  • Define Price List with base item price defined
  • Define new pricing attribute to capture Age and Model
  • Define new formula to setup the adjustment that needs to be done in price

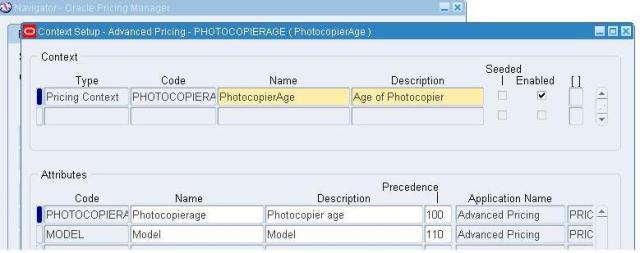
Define Context in Advance Pricing

Navigation: Oracle Pricing manager–>Setup–>Attribute Management–> Context and attribute

Define two attribute. One for Age and another for Model

Link Attribute in Attribute linking form of advance pricing.

Define New formula

Define Factor list and adjustment

Link the Price List with Formula in the Dynamic Formula field. This can be done in the price list form where the base price is defined.

Enter the Sales order and Price first defaults from price List as the base price

Now enter the Pricing attributes from Actions buttons

Now price is calculated as 1.5 as defined in factor adjustment

This is one of the example in which we can use the formula to create N dimensional pricing. Similarly you can also create formulas to create price relations Example Price of item A=Price of item B +20. In my next post I will discuss some more features of Advance Pricing.

Posted in Oracle Application, Oracle Pricing, Uncategorized | Tagged , , , , , , , | Leave a comment

Phases of Oracle Implementation

Oracle implementation project is always considered as big project and involve considerable amount of time and efforts from higher management also. It requires business process analysis, critical decision making for business processes. In this post we will try to explore the different phases in which an oracle project can be divided to achieve the best results. From the definition of project itself we can understand that every project is unique in nature and the same holds true for these phases. These are the guidelines which are provided by Oracle under AIM and are generic in nature. Project manager(s) need to understand each phase and decide the relevance of the same in their environment.

Phase 1 – Project Management

This phase start very early in the project and continue after GOLIVE during support period also. Starting of every project happens with a Project plan as well as the resource planning considering the high level requirement of the project. This project plan should be divided into the different phase of the project and then base lined. Any change in the requirement need to be taken as a change request and revised Project plan should be issued for stakeholder’s approval.

Key document Produced: Baseline Project Plan (mpp), Latest project Plan (mpp)

Key Owners: Stakeholders, Client Project Manager(s), Vendor Project Manger(s)

Phase 2 – Requirement Analysis

This is very critical stage of implementation. If proper time and participations are not given by business analysts then it could lead to major product dissatisfaction as well as lower the ROI of implementation. In this phase the product consultant arrange meetings with business analysts (key Business Users) to understand the client existing business processes. Following activities are performed by consultants

1. Understand and document the current Organization Structure         

2. Prepare the AS- IS Document which details about the existing business processes

3. Document the expectation after Oracle product is implemented

4. Note down the key areas which are considered as the bottleneck in the existing processes

5. Final Step (which is very important) is to get the sign off on all the requirements which are captured. This is the step which is missed and taken very lightly and can cause issue in managing the requirement at later stage

Key Document produced: Current Financial and Operating Structure (RD10), Business Requirements Scenario (RD50)

Key Owners: Business Analyst(s), Key Business user(s), Consultant(s), Project Manager(s)

Phase 3 – Solution Design

This is the phase which is termed as TO BE phase also. In this phase analysis is done on the existing Business practice and decisions are taken for providing the solution to each requirement. Gap analysis is also done for the requirements which can not be met by standard products. After the solution is designed by consultants then it need to taken with client in a walk through meeting (with flow diagram or Vision screenshots). This is mandatory as client need to understand the ‘To Be’ process as well as provide the sign off to Solution design. The areas where client is not satisfied need to be explored and alternate solution need to be designed.

Key document produced: Gap Analysis (BR10), Business Requirements mapping (BR30), Application Extension Functional Design (MD50) and Application Extension Technical Design (MD70)

Key Owners: Business Analyst(s), Key Business user(s), Consultant(s), Project Manager(s)

 
Phase 4 – Solution Building

During this phase the instance is prepared and setup is performed for meeting the solution design. This phase differs from project to project as in some cases huge amount of extensions and interfaces are developed. Those complex projects have this phase divided into different phases of system testing and integration testing. Following key activities performed in this phase

  • Consultant complete the setup from application
  • Test the standard Business processes and interact with Oracle for standard product issues
  • Technical consultant completes the customization and deploy for testing on the basis of MD070 and MD050
  • Functional Consultant complete the testing of customization and extensions

Key document produced: Application Setup (BR100), Unit Test Script (TE20), System Test Script (TE40), System Integration Test Plan (TE120) System Integration Test Script (TE50)

Key Owners:  Functional Consultant(s), Technical consultant(s), Project Manager(s)

Phase 5 – Training and UAT

In this stage client key user get exposed to the application first time. Functional consultant prepares training manuals and user guides to bring the comfort level for users. If user base is huge then train the trainer approach is used for training.

This phase is generally divided into two levels

Conference Level Pilot: Consultant works with Key users to demonstrate the application and take their feedback

User Acceptance Testing: Here Key users as well as End user performs the testing and provide acceptance of application.

 
Key document produced: User Training Manual, User Acceptance Test Report (TE130)

Key Owners: Functional Consultant(s), Technical Consultant(s), Key user(s), End User(s)

Phase 6 – Non functional Testing

For some of the complex project this phase become very critical as this provides the real life continuity and volume for testing. For the projects where huge amount of interfaces are used this phase is critical as extensions and interface need to be tested against the volume of data to test the performance.

Key Owners: Test team, Infrastructure team, Technical consultant(s)

Phase 7 – Production Cutover and Month end

After the UAT and NFT is approved, the production environment is replicated the same way as of approved NFT and UAT environment. The GO/NOGO meeting is conducted with the entire key stakeholder to get the GO decision. After the GO Decision the production environment is prepared. It is advisable to have this cloned to another environment which is termed as preproduction environment. This could be later used as promoting the code to production. After all the preparation it is handed over to users for entry. This is called as GOLIVE. Once the GOLive is done then consultants provide support to user for closing the first month and after the month end all the regular enhancement and issues will be managed by support team.

 Key document produced: Client Sign off certificate

 As mentioned previously in every project these phases are used differently and some of them overlap with each others. Especially the Solution Build and UAT phase does have lots of different type of testing involved which depends on the number of interface points. I will discuss few of the testing phases in any implementation project in coming posts.

Posted in Best Practices, Oracle Application | Tagged , , , , , , , , , | 4 Comments

Oracle Advance Pricing – Promotional Goods

Promotional goods feature adds a new item with a price adjustment or benefit when the customer orders one or more other items on the same order. 

If an order line qualifies for a promotional goods modifier (PRG), the pricing engine creates a new order line for the free good line. The PRG usually is setup as buy item A get item B at x percent off. In this case, if item A is ordered and if it qualifies for the PRG, the pricing engine creates the new order line with item B and it also applies the x percent discount to this new line. In case of buy 1 get 1 free, this discount is 100 percent.

To prevent a user from changing the quantity of the free promotional good added to the order line (for example, changing the quantity of the promotional good from 1 to 2), select the Pricing Phase 30 (All Lines adjustment) when you create the promotional modifier.

If you apply a modifier line of type Promotional Goods to an order, then delete the modifier line, you cannot reapply the deleted Promotional Goods modifier line.

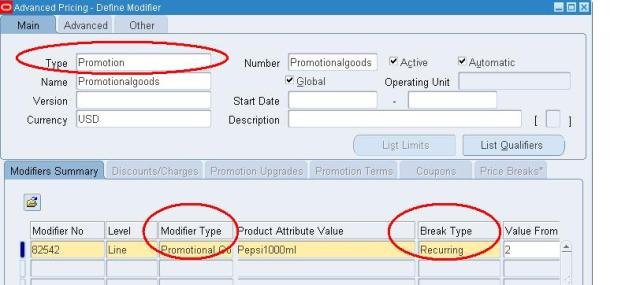
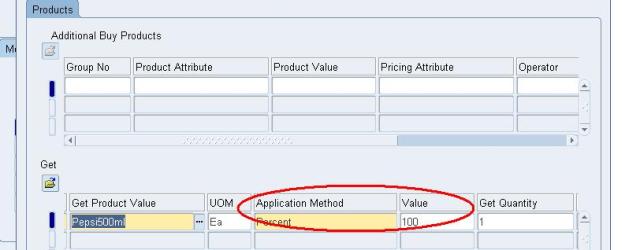
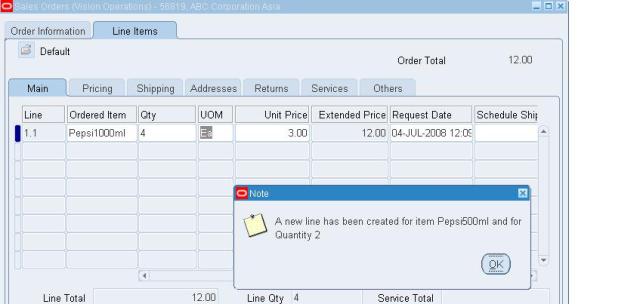
Scenario: Customer Buys 2 bottles of 1liter Pepsi and receive 500 ml Bottle of Pepsi free

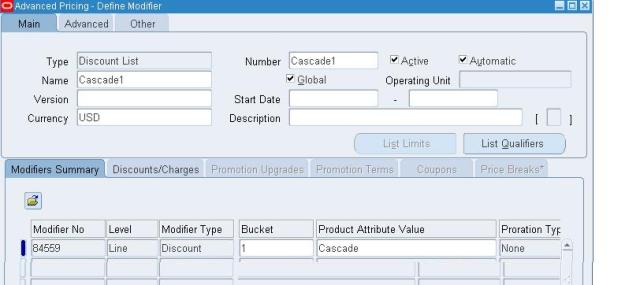
Define the Modifier

Define Details of get product in define detail form

Created one Sales order with 4 Qty of Pepsi one liter bottle and system has added 2 qty of 500 ml bottle automatically.

In my future post I will discuss some of the other features of Advance Pricing.

Posted in Oracle Application, Oracle Pricing | Tagged , , , , , | 7 Comments

Oracle Advance Pricing: Pricing Security

Price is the fee companies charge customer for the goods/services they sell/provide. Price would cover the cost incurred in manufacturing the finished item or in purchasing the item plus associated overhead costs and profit margin. Generally a price list would be created for all the items a company sells to its customers which would be revised periodically.Companies can have different prices for different Customers. Prices might differ based on the volume of purchase, if customer is a regular customer, item is a seasonal one, promotional sale etc. Oracle Advanced Pricing module helps in achieving the different Pricing functionality.  In this Post we will discuss the Pricing Security feature of Oracle Advance Pricing. We do have cases in which one of the divison does not want to show its price list to other divisions. In such cases pricing security is the feature that is used.

Pricing Security

Pricing security enables you to restrict pricing activities such as updating and viewing pricing entities to users who are granted specific access privileges. Pricing entities include price lists, pricing agreements, and modifiers.

Pricing security can be set up and maintained in the HTML user interface by a user who is assigned the Oracle Pricing Administrator responsibility. The Oracle Pricing Administrator has the authorization to access and update all pricing entities for all functional users.

With pricing security, you can implement a higher level of control by:

 • Assigning pricing entities to operating units: A pricing entity can be assigned ownership to a specific operating unit. You can restrict usage to one operating unit or by all operating units.

Assigning privileges that control which grantee (Global, Operating Unit, Responsibility, or User level) can view or maintain the specified entity: You can use security privileges to control users’ access to pricing entities in the following ways:

  • Grant view-only or maintain access privileges to functional users at the Global, Operating Unit, Responsibility, or User level.
  • Assign or reassign Operating Unit ownership to price lists and modifiers and control which operating units can use them for pricing transactions.

Create entity sets (a set consists of grouped pricing entities) and assign access privileges to the entire set. The Entity Set function is available only with license to Advanced Pricing.

Setting default rules for security access for new pricing entities.

Warning: Before turning on pricing security, you must create privileges for existing pricing entities.

When Pricing Security is Off

 • For a modifier or price list, if the PTE and source system are the same as those set in the user’s profile options, QP: Pricing Transaction Entity and QP: Source System Code, then the Update icon will be enabled and the Details icon will be disabled.

 • For a modifier or price list, if the PTE and source system are different from those set in the user’s profile options, QP: Pricing Transaction Entity and QP: Source System Code, the Update icon will be disabled and the Details icon will be enabled.

 • When the source systems are different (and the PTE is the same as in the QP: Pricing Transaction Entity profile option), you can view only the price lists and modifiers for the PTE specified in the profile option.

 When Pricing Security is On

• For a modifier or price list with Maintain and View privileges, if the PTE and source system are the same as those in the user’s profile options, QP: Pricing Transaction Entity and QP: Source System Code, then the Update icon will be enabled and the Details icon will be disabled.

 • For a modifier or price list with Maintain and View privileges, if the PTE and source systems are different from those in the user’s profile options, QP: Pricing Transaction Entity and QP: Source System Code, then the Update icon will be disabled and the Details icon will be enabled. This condition occurs when the same PTE is defined for both the user’s profile option, QP: Pricing Transaction Entity, and the modifier or price list, but the source systems are different. The behavior is the same in the forms-based UI.

• If the modifier or price list has View-privileges only, the Update icon will be disabled and the Details icon will be enabled, regardless of the PTE and source system for which the modifier or price list belongs.

Setup Steps for Implementing Pricing Security

After upgrading to pricing security, pricing security is not switched on automatically. Pricing users with functional access can still fully view and maintain existing price lists and modifiers as before the upgrade.

Before turning security on, following setups steps should be reviewed and completed for implementing pricing security, otherwise, pricing users may be unable to query any price lists or modifiers in the pricing windows. After security setup have been completed the concurrent program QP: Security Control with Views Conversion needs to be run to turn on pricing security.

Note: The profile option QP: Security Control (read-only) displays the current setting of the security option for entire installation (either on or off). Oracle Pricing Administrator responsibility needs to be assigned to set up and maintain the pricing security features for all functional pricing users.

Step 1: Map security access requirements

Identify and map all price lists, modifiers, and agreement price lists to:

• Operating units that should own and maintain them.

• The users in those operating units who require View-Only or Maintain access (view and update) to pricing entities.

• Operating units that use them when pricing transactions.

 Step 2: Assign ownership of pricing entities (Entity Usage page)

 The next step is to assign preexisting price lists and modifiers to an operating unit. Use Global Usage settings to restrict the entity to a specific operating unit or make it available across all operating units.

Step 3: Create privileges (Privileges page)

The next step is to create access privileges for all users in all operating units. You can assign view or maintain access to a pricing entity. Optionally, you may want to create entity sets that enable you to group multiple entities of the same entity type, and then grant access to the entity set. For example, you may want to create a set called Summer Set that contains all active modifiers with Summer Promotion in the modifier name. Then you can assign privileges to the entity set rather than to each entity separately.

Note: You must have a license for Advanced Pricing to use entity sets.

 Step 4: Set security profile options

Use the following security profile options to set the default security privileges for pricing entities that are newly-created:

 • QP: Security Default ViewOnly Privilege: Sets the default Viewing privileges for newly-created pricing entities.

 • QP: Security Default Maintain Privilege: Sets the default Maintain privileges for newly-created pricing entities.

 • QP: Security Control (read-only): This profile option displays the current setting of the security option for your entire installation (either on or off). This profile option value cannot be directly updated – only the concurrent program QP: Security Control with Views Conversion can turn pricing security on and off.

These profile options are delivered in default settings that maintain the existing functional security features of Oracle Pricing. Before you can change these profile settings, the Oracle Pricing Administrator must map the complete security access requirements for each pricing entity. No security profile option should be changed until these steps have been completed.

 Step 5: Turn on pricing security

To activate pricing security, set the concurrent program QP: Security Control with Views Conversion to ON. This is the “switch” that turns security on or off for your installation. Before setting the program to ON, ensure you have completed all the preceding implementation steps.

Oracle Advance pricing does offer variety of feature like formula pricing, Buy one get one free, N dimensional pricing, Block pricing, Item Upgrade etc. I will try to explore few of them in my next posts.

Posted in Oracle Application, Oracle Pricing | Tagged , , , , , , , , , , , , | 2 Comments

Dual Unit of Measure : New functionality of R12 for discrete Inventory

Dual UOM or Catch Weight management is used primarily in the meat and metal Industries. In these industries due to variability of each piece logistic unit of measure will generally differ from the valuation unit of measure. Shipping and receiving generally happens in pieces or Box but payment happens on the weight. The key requirement for this business process is to track the inventory in two different unrelated UOMs where the relationship between both the UOMs is not fixed.

Inventory module’s Dual Unit of Measure functionality enables users to transact inventory items in two unrelated units of measures. With this functionality we can track item both in primary UOM as well as secondary UOM. Both the UOM and QTY are stored in the separate fields called secondary UOM and Secondary Qty in Database. This functionality was available in process inventory in 11i but introduced to discrete inventory also in R12.Thus, if a user chooses to enable dual unit of measure control for a given inventory item,Oracle Purchasing module will now require quantity entry in two units of measure according to the defaulting rules set up at the item level.

We need to be aware that by just defining an item in dual UOM does not set the system to track the transaction in both the UOM. While creating an item we should set “Tracking ” as ” Primary and Secondary”. once done system will track all transactions in primary and secondary quantity and UOM.Items, which are tracked for Primary & Secondary unit of measure, have visibility to both the primary and secondary units of measure throughout all the standard inventory inquiries for Oracle Inventory organizations.

 Setups and Process

 The Key setups and process for Dual UOM is

 Step 1: Create a New Item

Navigate to Inventory > Item > Master Item

 Under main Tab –>UOM Section

  • Define primary UOM
  • Tracking as Primary and Secondary
  • Pricing as Primary
  • Secondary UOM
  • Defaulting as Default (if you don’t want application to automatically default the converted UOM value then select No default)

 Step 2: Define conversion between 1st UOM and 2nd UOM of this Item
Navigate to Inventory > Setup > UOM > Conversion

 Step 3: Do a Mis transaction or enter the sales order

 Because we set Defaulting value to “Default” in step 1, so when we input the Quantity, its auto calculate the Second Quantity use the UOM conversion defined in step 2.

 Step4: Validate the on hand Qty

 You could be able to see the inventory in Both the UOMs

Following modules of Oracle provide complete support to the Dual UOM once the  necessary setups are done at Item level.

 Purchasing

  • Requisitioner can create online requisitions in two UOMs
  • Requisition can be auto created by Buyers can create POs in two UOMs
  • Receiving can be done in both the UOMs. User need to enter the quantites for both the UOM while receiving.

 Order Management & Shipping

  • Sales orders can be entered in two UOMs
  • Shipping can select the lot for which both the UOMs are defined

 Pricing

The pricing unit of measure can be defined as either the primary or the secondary unit of measure for the item. Price lists are then created for that item in its pricing unit of measure.

 E.g. If the meat has a pricing unit of measure in Kg, then at the time an order is taken the order line shows the default conversion value (for example, 2 Kg) as the pricing quantity  and because the shipping lot is yet not known. A price based on that 2 Kg is calculated. During shipping when the lot XYZ is selected which has a weight of 2.1 Kg the extended price will be changed to reflect the correct value.

 Costing

The primary unit of measure defined in the item master is assumed to be the costing unit of measure for that item. Therefore inventory valuation is based on the primary unit of measure for each item. Quite often this same unit of measure is used for pricing (cost plus pricing). For catch weight items, the primary unit of measure and costing unit of measure is not usually the count, but rather the actual weight/volume or logical unit of measure.

This is useful feature for few of the industry and with this new feature users will get more flexibility in using Oracle Inventory.

Posted in Oracle Application, Oracle Inventory | Tagged , , , , , , , , , | 1 Comment

Oracle Application Implementation: How to Measure the Success?

Business Metrics for Oracle Application Implementation

Oracle Application implementation is always seen as an opportunity to reengineer the existing business Processes as well as to define and analyze the metrics for its success. These operational metrics are business driven and helps higher management for evaluating the project success. In short when you don’t have measurement you don’t know whether the implementation was a success or failure.

These KPIs (metrics) are benchmarks with qualitative or quantitative values that help an organization assess the effectiveness of the processes that have been implemented in the ERP system. However it may not be suitable to expect important improvement in these values immediately after the implementation. An organization needs to give itself the time to take up the changes brought about in by the ERP system to practically achieve the KPI targets

Few of the examples for these metrics are:

     Order Management and Shipping

  • Average Shipping time
  • Backorder Amount
  • Backlog Aging
  • % of late shipment
  • % of wrong shipment

     Inventory

  • Inventory Carrying Cost
  • Tracking Supplier returns
  • Reduce losses on returns
  • Obsolete inventory

     Procurement

  • Contract Leakage Rate
  • % Non Contract Purchase
  • Unprocessed requisition Average Age
  • PO Sourced to wrong supplier
  • % of POpast Need by date

      Payables

  • Payable Leakage rate
  • Late paid invoice
  • % Discount taken
  • Accrual reconciliation

These are the sample values for the business metrics. These operational metrics are specific for each module and varies from industry to industry. For each metrics we should be able to collect information like Metric, Definition, Industry norm, Values before ERP implementation, Values after steady state. Most of the implementation does not give enough stress to these metrics as the results are always visible after steady state. But it is worth investing the time on these metrics as it helps measuring and reviewing the success of the implementation.


Posted in Best Practices, Oracle Application | Tagged , , , , , , , , | Leave a comment

Deferred COGS: How to use this feature of Oracle Apps R12

Finally a relief for all the accounting users who had problems working with oracle apps due to period mismatch of revenue and cost recognition. Generally the orders which are shipped on the last day of month have this issue. As most of you know that till release 11i, the value of good shipped is expensed to COGS when the material in ship confirmed in shipping and revenue will get recognized after the invoices are generated in AR and revenue recognition is done. The problem that accountants face with this design is that on the last day of month COGS gets recognized when we ship confirm the material but invoice gets generated in next month and so revenue gets recognized in different month. This does not look good from the matching principle which requires the revenue and cost should get recognized in the same period.

The deferred COGS account is the new feature introduced in Release 12. The key fundamental behind the feature is that the COGS is now directly matched to the Revenue. In simple terms, this means, COGS for an order line will be recognized only if the revenue is recognized for that line making sure that the revenue and COGS are posted in the same month. Matching percentage is also taken care which ensures that revenue and cost are always in sync.

Setup: Only one key setup involved for this functionality is to define the Defer COGS account.
Navigation: Inventory à Setup à Organization à Parameters à Other Accounts

Business Process:

In R11i When a Sales order is shipped and interface trip stop is completed. This make a call to COGS workflow to generate the COGS account. This then generate following accounting.

Cr                    Inventory Valuation account $250
          Dr         COGS Account                                 $250

In R12 when a sales order is shipped and interface trip stop is completed the following accounting entries gets generated.

Cr                    Inventory Valuation account           $250
           Dr         Deferred COGS Account                            $250

After the AR invoice is generated and the revenue is recognised (Considering you don’t have revenue recognition policies or specific accounting rules), following program will create COGS recognition transaction. This will reflect a change in the revenue recognition percentage for a sales order line.

1. Collect Revenue Recognition Information program: This program will collect the change in revenue recognition percentage based on AR events within the user specified date range. It collects invoice information of the sale order line from RA_CUST_TRX_LINES_ALL and RA_CUST_TRX_LINE_GL_DIST_ALL after the revenue is recognized and check the percentage revenue recognized. It then insert information in CST_REVENUE_RECOGNITION_LINE.

 Navigation: Cost > COGS Recognition > Collect Revenue Recognition Information

 2. Generate COGS Recognition Events: This program will create the COGS recognition transaction for each sales order line where there is a mismatch between the latest revenue recognition percentage and the current COGS recognition percentage. This is the program which also makes the transactions costed by creating these accounting entries. So cost manager is not used to make these transactions as costed in R12.The COGS account in this entry is taken from the distribution_account in mtl_material_transactions table (which was generated earlier by COGS workflow).

  Cr                   Deferred account                       $250 (Actual Revenue %)
            Dr         COGS Account                           $250 (Actual Revenue %)

Navigation: Cost > COGS Recognition > Generate COGS Recognition Events

This particular COGS recognition transaction actually correspond to a revenue recognition percentage change. 

As we have seen above this new feature does help in resolving some of the key accounting issues but we need to be aware of the following also

  1.  With this feature the COGS recognition now requires few extra concurrent requests to be submitted.
  2. AR revenue need to be recognized to have COGS recognized
  3. This functionality is not optional as it is mandatory to be used in R12
  4. To make the complete set of transactions visible in the Material Transaction screen, ‘Include Logical Transaction’ checkbox need to be checked.

This concludes our discussion about Deferred COGS.  Now I am planning to pick some topic from procurement as we have not touched that area till date.

Posted in Oracle Application, Oracle Order Management | Tagged , , , , , , , | 15 Comments

Oracle FIXED_DATE Parameter: Helpful during Testing?

While doing implementation of oracle application in one of my project we came across a requirement for testing ahead a year and a quarter. The requirements were to process transactions in future/past and complete the year end closing. As we know Oracle applications are getting their ‘current date’ from sysdate and then do processing. Even though most of the financial closing can be managed through GL Date but some of our scenarios was to validate against the system date. What we were looking at that time to find some solution and easy way to change the date rather then changing the server date. As by changing the server date we were impacting the other applications that were residing on the same server. Then we came across with this very little known parameter called FIXED_DATE

As per Oracle FIXED_DATE enables you to set a constant date that SYSDATE will always return instead of the current date. To undo a fixed date setting, specify FIXED_DATE=NONE.

This parameter is useful primarily for testing. The value can be in the format shown above or in the default Oracle date format, without a time. Setting this parameter to a specified timestamp will make the time constant for the database engine (the clock will not tick) FIXED_DATE is a dynamic parameter and can be changed using the ALTER SYSTEM command.

How to set FIXED_DATE :-

ALTER SYSTEM SET FIXED_DATE=’2010-01-30-00:00:00′;

SQL> select sysdate from dual;

SYSDATE
———
30-Jan-10

Note: The format can be as shown above or the oracle default date format.

How to unset:-

ALTER SYSTEM SET FIXED_DATE=NONE;

SQL> select sysdate from dual;

SYSDATE
———
07-Jan-11

Setting this parameter does not impact systimestamp and you can always see the server time, you can use systimestamp. This is usually used for testing/development purposes, when the application logic depends on a specific date/time combination.

 Few points to consider while enabling this feature for Oracle application Testing:

  1.  Don’t go in the future as some of the business process does not allow dates in future. We had issues in receiving (sub ledger) as receiving is not allowed in future due to audit reasons and due to that we were not able to test the Express receiving in iprocurement
  2. Requisition Need by dates are not allowed in past but we had workaround of changing the need by date inPO
  3. Alerts which are defined in Alert Manager and need to be tested with time could not be tested
  4. Workflow background process didn’t behave correctly as it was not able to pick the activity with correct time. We had issue in closing our sales orders as they were depending on workflow background process.

This parameter did help us in testing future and in past but we had our own share of issues also for application testing. So this is recommended to do complete due diligence for using this parameter for oracle application testing.

Posted in Oracle Application, System Admin, Uncategorized | Tagged , , , , , | Leave a comment